
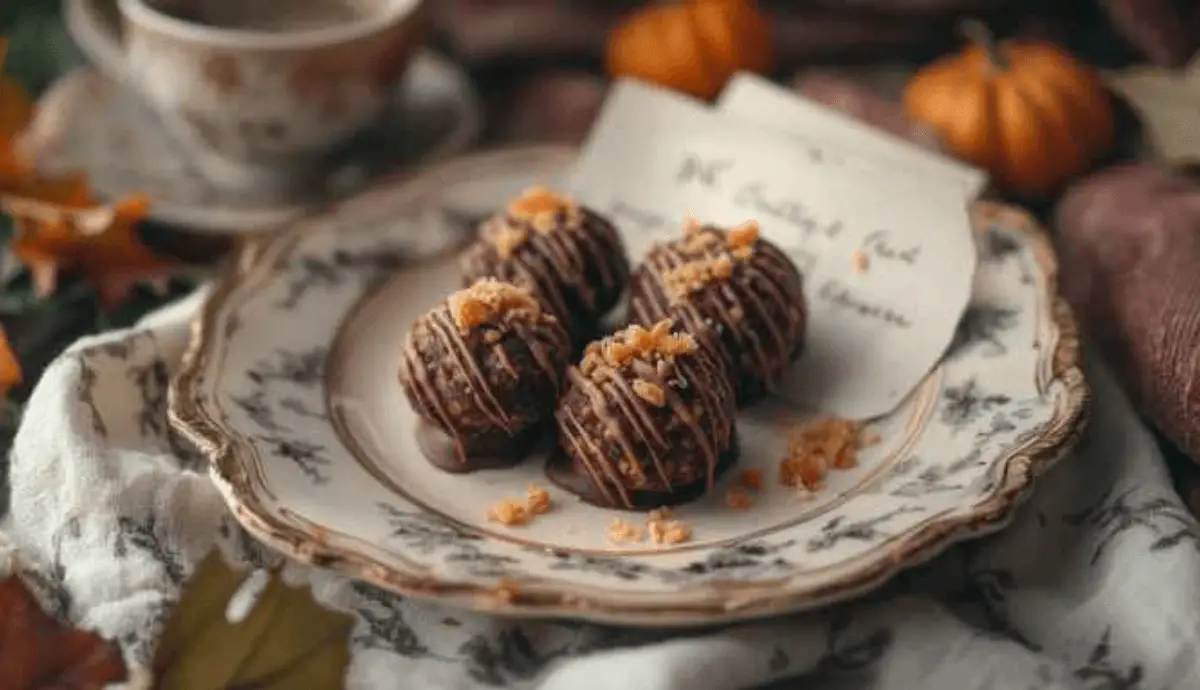
There’s just something magical about a recipe for no bake Butterfinger balls. Maybe it’s the crunchy-sweet bite of crushed candy tucked into a blanket of creamy peanut butter, or maybe it’s the way these little treats always make an appearance around the holidays in our house. Whatever the reason, this easy, no-bake dessert has been passed through generations and today, I’m sharing our old-fashioned version that tastes like childhood and comfort rolled into one.
I still remember the first time Grandma handed me one of her Butterfinger balls, giggling as I took a bite and ended up with chocolate on my nose. “Now you’re officially part of the sweet tooth club,” she said with a wink.
Table of Contents
Why You’ll Love This Recipe for No Bake Butterfinger Balls
These bite-sized Butterfinger balls are nostalgic, crave-worthy, and come together without even turning on the oven. Whether you’re making a quick batch for a party tray, holiday gift tins, or just because you’re craving something indulgent and homemade, these treats will become your new favorite no-bake go-to.
- Old-fashioned flavor, modern ease: A nod to Grandma’s recipes, but simple enough for beginner bakers.
- Textural heaven: Creamy peanut butter meets crushed graham crackers, candy pieces, and a chocolatey shell.
- Perfect for all seasons: A year-round delight that fits just as beautifully on a Christmas cookie plate as it does at summer picnics.
- Adaptable for any diet: Check below for my tips on making a healthy recipe for no bake Butterfinger balls.
If you’ve been looking for the best recipe for no bake Butterfinger balls, you’re in the right kitchen.
Ingredients Recipe for No Bake Butterfinger Balls
These sweet morsels use pantry staples with one special star ingredient Butterfinger candy bars. No fancy equipment or baking required!
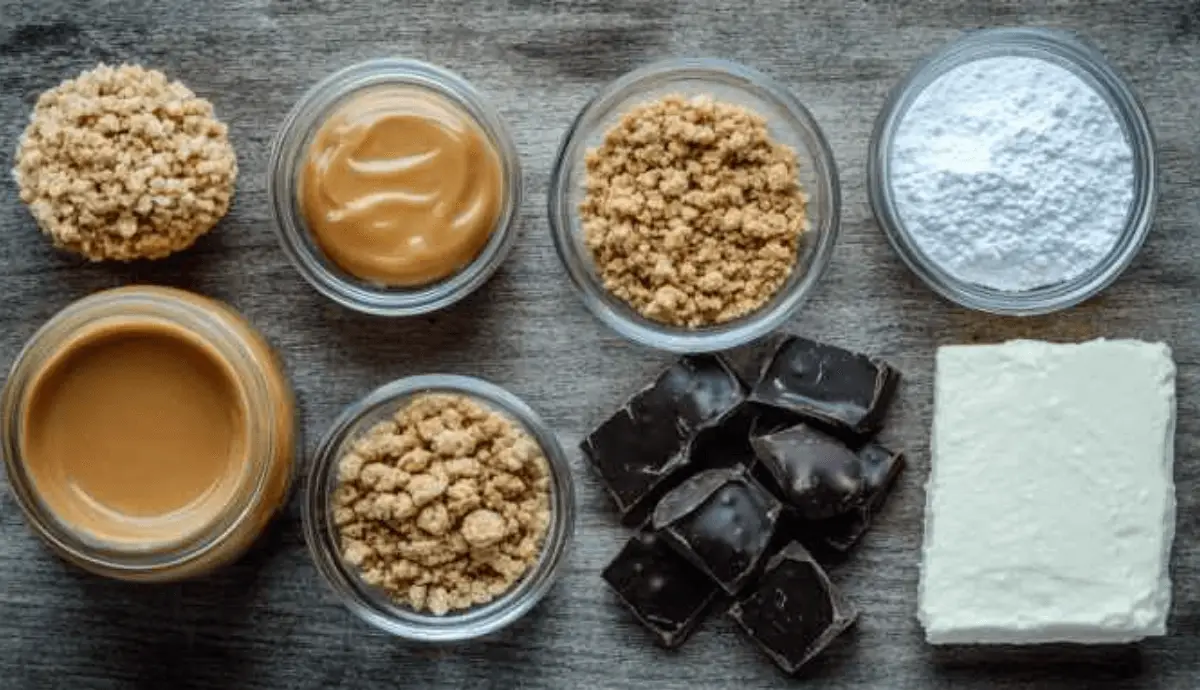
What You’ll Need (Ingredients)
- Creamy peanut butter
- Crushed graham crackers
- Butterfinger candy bars (crushed)
- Cream cheese
- Powdered sugar
- Vanilla extract
- Corn flakes (optional, for texture)
- Chocolate chips or almond bark (for dipping)
Why These Ingredients Matter
Peanut butter gives these balls their rich, nutty base just like Grandma used to mix with her favorite wooden spoon. Crushed Butterfinger bars add the sweet crunch we all crave, while graham crackers keep everything firm without needing to bake. Cream cheese is my secret for extra richness and helps the mixture roll easily. And of course, that chocolate coating? It’s the crown jewel of each bite.
Next up: We’ll walk through the process together step by step.
Instructions Recipe for No Bake Butterfinger Balls
This recipe is a breeze, which is why it’s one of my favorite go-tos during busy weeks or holiday prep marathons. No oven, no stress just melt, mix, roll, and dip.
Step-by-Step Directions
Step 1: Crush the Crunchy Bits
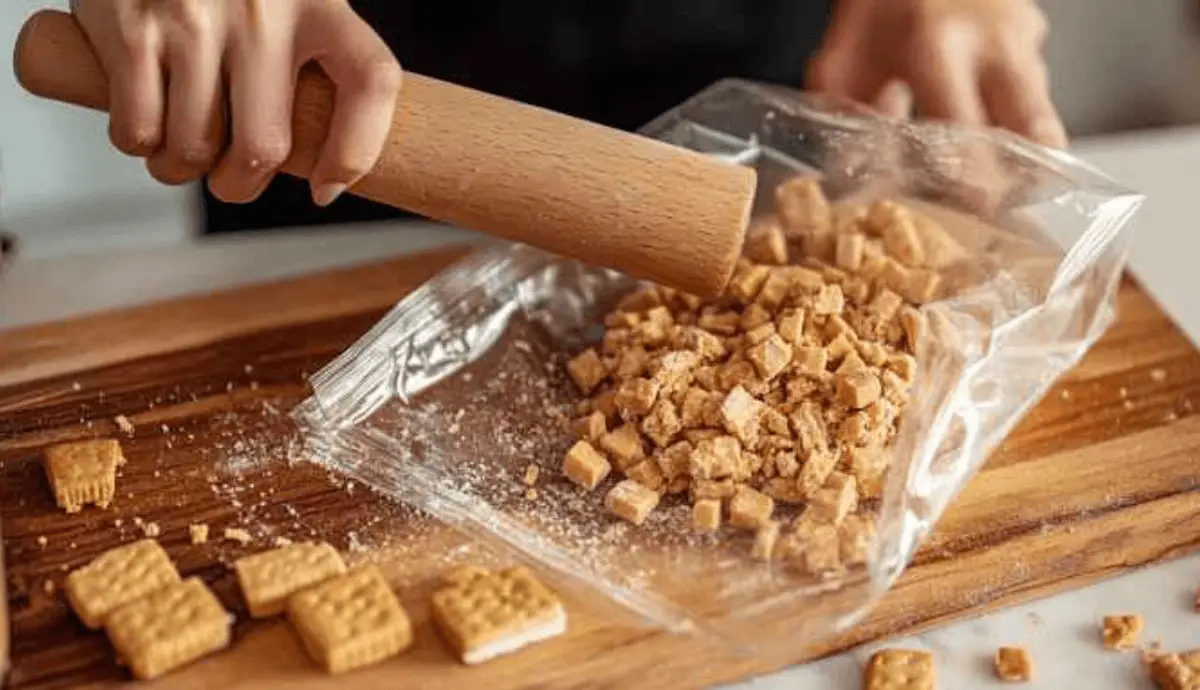
Start by placing your Butterfinger bars, graham crackers, and corn flakes (if using) into a zip bag. Crush them using a rolling pin or pulse them in a food processor. You want texture, not dust.
Step 2: Mix the Base

In a large mixing bowl, combine the peanut butter, softened cream cheese, and powdered sugar. Add the crushed ingredients and stir until well blended. Add vanilla extract.
Hint from Grandma: Let the mixture chill in the fridge for 15–20 minutes it firms up and makes rolling easier!
Step 3: Roll into Balls
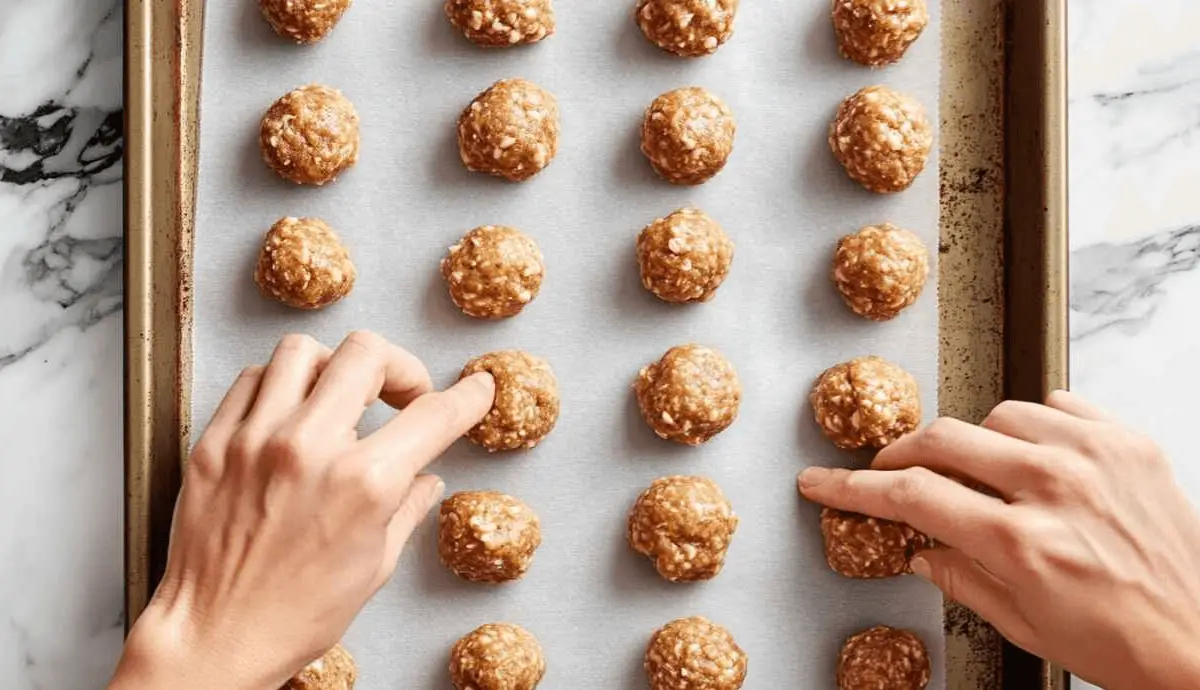
Scoop tablespoon-sized portions and roll into balls. Place them on a parchment-lined baking sheet.
Step 4: Dip in Chocolate
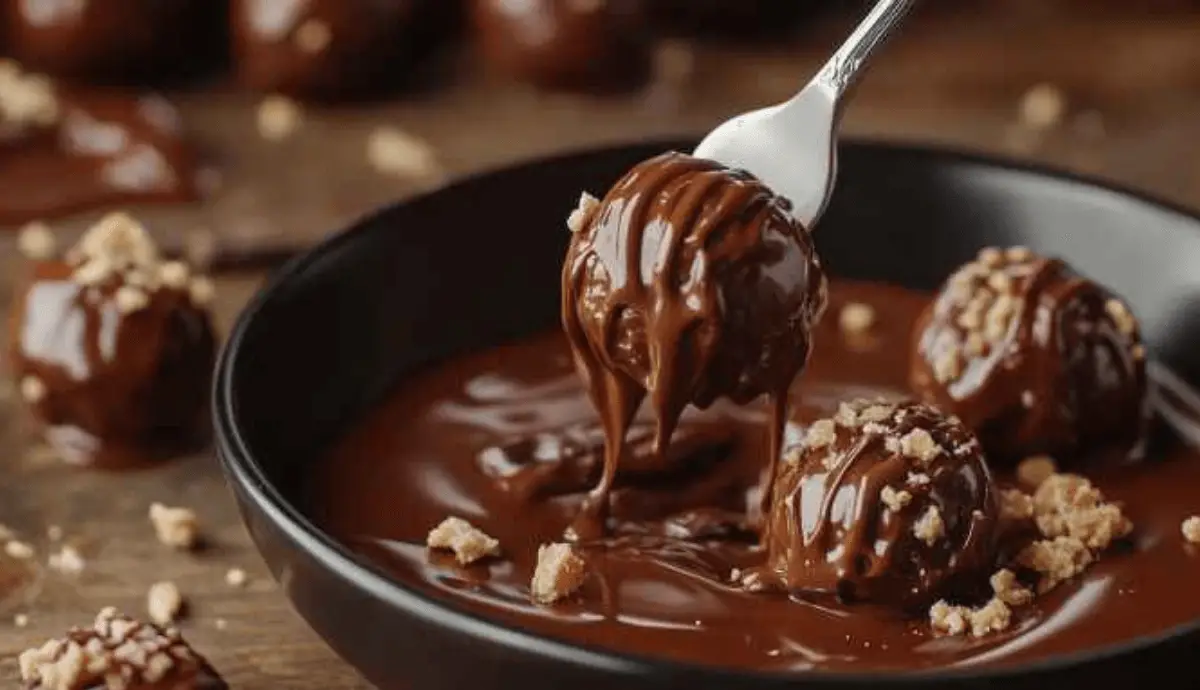
Melt your chocolate chips or almond bark. Dip each Butterfinger ball in chocolate, letting excess drip off. Set back on parchment.
Step 5: Chill and Set
Pop the tray in the fridge for 30 minutes or until the chocolate coating is firm.
Cooking Tips Recipe for No Bake Butterfinger Balls
- Don’t skip chilling the mix it makes the rolling step so much smoother.
- Want to add a little sparkle? Sprinkle with crushed candy on top before the chocolate sets.
- Slow is better when melting chocolate use a double boiler or microwave in short bursts to prevent scorching.
Grandma always said, “There’s no rushing good chocolate. It needs a moment, like all good things in life.”
Personal Anecdote
The first time I tried to make these on my own, I was 12. I forgot to crush the Butterfingers and tossed whole chunks into the bowl. Grandma walked in, took one look, and burst out laughing.
“Looks like someone made Butterfinger bricks, not balls!” she teased, handing me the rolling pin.
We laughed until our sides hurt, and by the end, I had learned how to crush candy like a pro and the value of patience in the kitchen. That day, I learned that even our flops can become sweet memories.
Substitutions Recipe for No Bake Butterfinger Balls
- Gluten-free? Use gluten-free graham crackers or rice cereal instead of the original.
- Dairy-free? Swap the cream cheese for a vegan version and use dairy-free chocolate chips.
- Low-sugar option? Opt for unsweetened peanut butter and reduce powdered sugar by half; use sugar-free chocolate chips.
These swaps make it easy to turn this into a healthy recipe for no bake Butterfinger balls without losing the nostalgic joy.
Variations on Recipe for No Bake Butterfinger Balls
Want to switch it up? Here are some fun ideas:
- Holiday Peppermint: Add crushed candy canes for a minty twist.
- Spiced Fall Flavor: Mix in a dash of cinnamon and nutmeg for a cozy touch.
- Kids’ Party Pop-ins: Add rainbow sprinkles to the chocolate coating.
- Protein Power: Stir in a scoop of vanilla protein powder for energy-packed bites.
These twists make this the most versatile Butterfinger balls recipe around!
Equipment Recipe for No Bake Butterfinger Balls
You don’t need much, which makes this even better:
- Mixing bowl
- Wooden spoon or spatula
- Food processor or rolling pin
- Baking sheet
- Parchment paper
- Microwave-safe bowl or double boiler for melting chocolate
If you don’t have a processor, that rolling pin over a zip bag trick works like a charm just how Grandma taught me.
Storage Tips Recipe for No Bake Butterfinger Balls
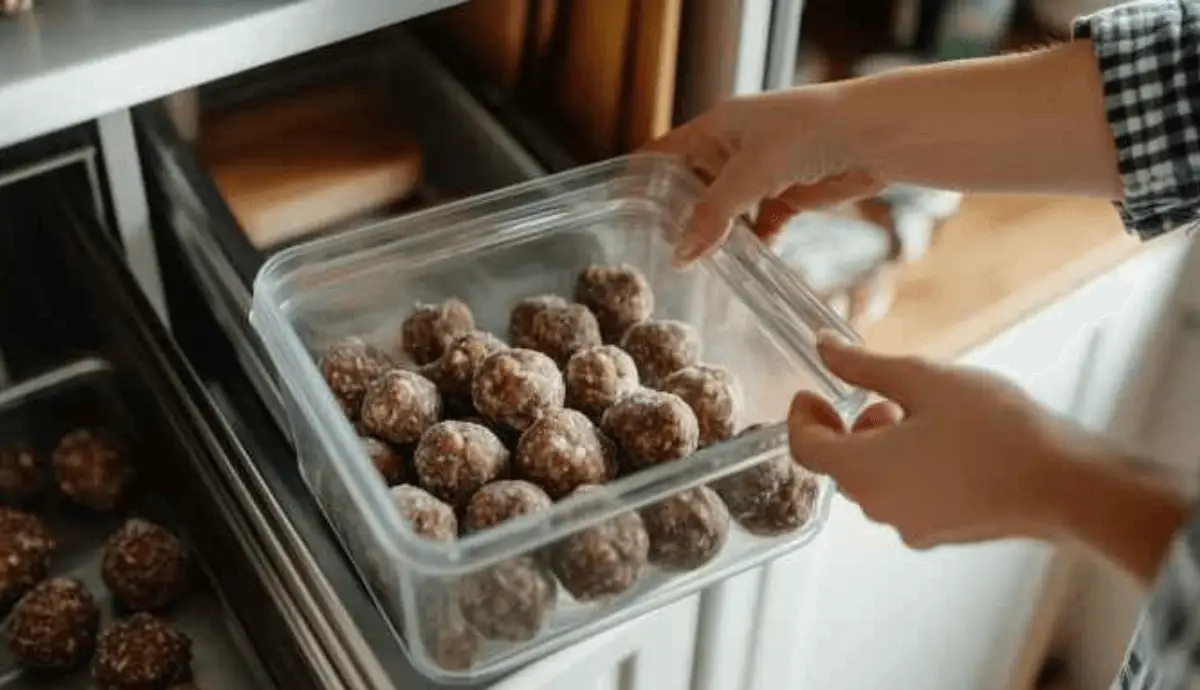
- Fridge: Store in an airtight container up to 7 days.
- Freezer: Freeze for up to 3 months just thaw before serving.
- Lunchbox-ready: Keep chilled in a small container with an ice pack for mid-day pick-me-ups.
These make great make-ahead treats for parties, bake sales, or just for keeping sweet moments on standby.
Grandma Mary’s Secret for Butterfinger Balls
Grandma always added a pinch of salt to her mix. “Sweet needs a little sass,” she’d say, tossing in that extra touch. And you know what? She was right. A tiny bit of salt wakes up every flavor, from the peanut butter to the chocolate.
FAQ about Recipe for No Bake Butterfinger Balls
What are the primary ingredients needed?
Peanut butter, cream cheese, crushed Butterfinger candy bars, graham crackers, powdered sugar, and chocolate for coating.
How long does it take to make these?
From start to finish, about 45 minutes, including chilling and dipping.
Can I substitute any ingredients?
Yes! Check our substitutions section above for gluten-free, dairy-free, and low-sugar options.
Do these taste like store-bought Butterfinger bars?
They’re even better soft, crunchy, sweet, and made with love. Just like Grandma used to make.
Conclusion
If you’ve been searching for an old fashioned recipe for no bake Butterfinger balls, consider this your new favorite. Easy to make, endlessly customizable, and packed with all the joy of a family treat passed down through generations. These little bites of bliss are exactly the kind of thing that brings people together.
If you loved making these no-bake Butterfinger balls, you’re in for a treat with even more easy desserts. Try the irresistibly creamy No Bake Peanut Butter Cheesecake Balls, or whip up a nostalgic batch of Easy Cool Whip Candy for a crowd-pleaser. For chocolate lovers, don’t miss the gooey Peanut Butter Cup Dump Cake or get a taste of summer any time with this Strawberry Shortcake Ice Cream. And if you’re on the hunt for a trendy homemade cookie, the Mama Kelce Cookie Recipe is a must-try.
Thanks for joining me in the kitchen today. Until next time,
From my heart to your table,
Chef Tima

Recipe for No Bake Butterfinger Balls
- Total Time: 45 minutes
- Yield: ~20 balls
- Diet: Low Calorie
Description
These old-fashioned no bake Butterfinger balls are crunchy, creamy, chocolate-dipped bites of nostalgic bliss. Made with peanut butter, crushed corn flakes, cream cheese, and chunks of Butterfinger candy, they’re a simple no-bake treat that brings big flavor with minimal effort. A holiday favorite and a kid-approved dessert—straight from Grandma’s recipe box with love.
Ingredients
- 1 cup peanut butter
- 1/3 cup maple syrup or honey
- 1/2 cup coarsely crushed corn flakes
- 2 cups crushed Butterfinger candy bars
- 4 oz cream cheese, softened
- 1 cup powdered sugar
- 1 tsp vanilla extract
- 2 cups chocolate chips or almond bark (for coating)
Instructions
- In a large bowl, combine peanut butter, cream cheese, powdered sugar, and vanilla until smooth.
- Fold in crushed Butterfinger candy and corn flakes.
- Chill the mixture for 15–20 minutes until firm.
- Scoop and roll into 1-inch balls; place on a parchment-lined tray.
- Melt chocolate in microwave or double boiler.
- Dip each ball in chocolate, shake off excess, and return to tray.
- Refrigerate for 30 minutes or until set.
- Store in the fridge up to 7 days or freeze for up to 3 months.
Notes
Use gluten-free corn flakes for a GF version. Maple syrup adds depth; honey brings brighter sweetness choose your favorite. A pinch of salt enhances the chocolate and peanut butter combo (Grandma’s trick). Top with crushed Butterfinger before chocolate sets for a pretty finish.
- Prep Time: 25 minutes
- Cook Time: 0 minutes
- Category: Dessert, No-Bake Treats
- Method: No Bake
- Cuisine: American
Nutrition
- Serving Size: 1 ball
- Calories: 180
- Sugar: 12g
- Sodium: 65mg
- Fat: 11g
- Saturated Fat: 5g
- Unsaturated Fat: 5g
- Trans Fat: 0g
- Carbohydrates: 18g
- Fiber: 1g
- Protein: 3g
- Cholesterol: 5mg